


Fitting Instructions Wood And Faux Wood Blinds

MOUNTING INSTRUCTIONS
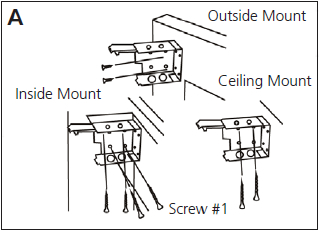
A. Brackets should be placed at the width of blinds headrail 6mm past each end. The bracket doesn’t necessarily need to touch the inside face of the window frame.
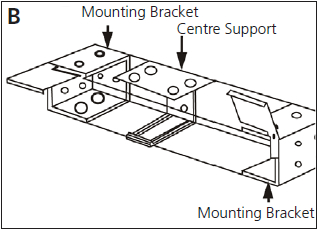
B. Align the top of the center support bracket with the top of the mounting bracket before installation. Install with the bigger flap of the center support bracket on the top side and clear of the slat ladder positions.
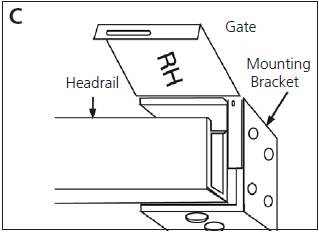
C. Push the rail into brackets. Then press the gate to close the brackets.

D. Screw valance clips onto the back side of the valance with screws provided(Screw #3)

E. For Outside Mount: Screw one end of the valance return clip onto the valance using Screw #3. Align the edge of the valance return with the valance. Screw the other end of the valance clip onto the valance return.
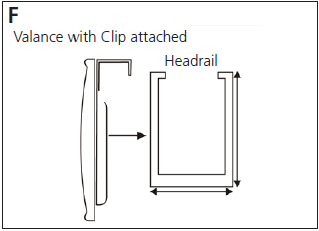
F. Hook valance clip with valance attached onto the top of the headrail.
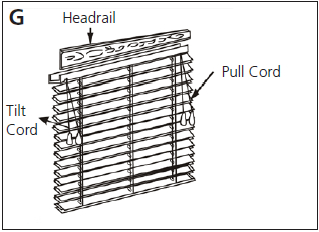
G. Always tilt the blind horizontally before raising/lowering to extend the life of the blind. To lower the blind: Move the cord to the left pulling down gently until the cord lock releases. To raise the blind: Pull the cord downward until the blind reaches the desired height. To lock cords: Pull the cord right and release. The cord will lock automatically.
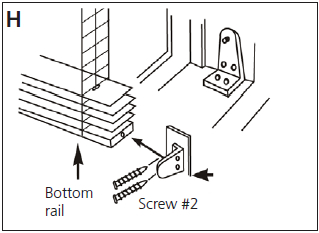
Installing Hold Down Brackets(Optional)
H. Hold down brackets: Using two small screws, screw hold down the bracket to the window facing or wall.
Snap bracket pin ends into the hole at the bottom rail end.
WARNING
Reduce the risk of strangulation to infants and toddlers.
Position safety cord-stops before using blinds.
TO POSITION SAFETY CORD-STOPS:
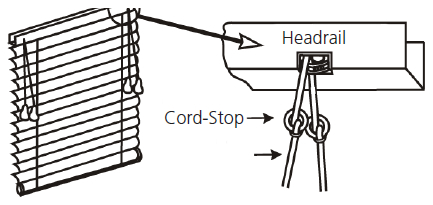
1. Install the blind as directed by the manufacturer making sure the headrail is securely fastened. Lower the blind to the maximum desired length and lock it into place.
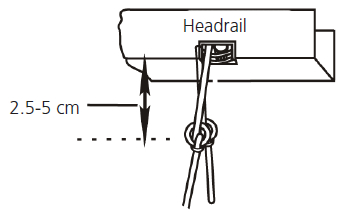
2. Measure the distance from headrail to cord-stops. If cord-stops are 2.5cm to 5cm below the headrail no further adjustment is needed. Your blind is ready to be used.
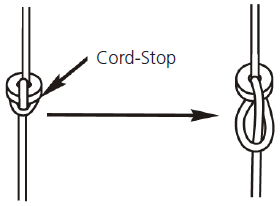
3. If cord-stops ARE NOT 2.5cm to 5cm below the headrail loose (but do not untie) the knot surrounding the cord-stop.
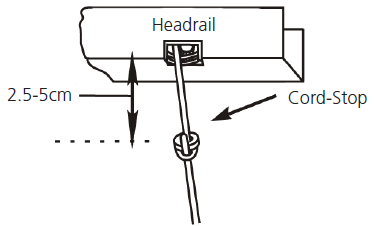
4. Push both the cord-stop and the loosened knot toward the headrail until the cord-stop is 2.5cm to 5cm below the headrail. Hold cord-stop in place and pull firmly on lift cord to retighten knot. Repeat steps 2, 3 & 4 for each cord-stop.
( Note: Use of hold down bracket is recommended to fully utilise the safety feature of the cord-stops )
SAFETY CLEAT FITTING INSTRUCTIONS
STEP 1
- Place the safety cleat in the desired location on the wall and mark the position of the two holes using a pencil.
- We recommend positioning the cleat to either side of the blind and out of the reach of children
- Remove the safety cleat and drill the position marked Once the holes are drilled place a raw plug into the holes
- Use the screws provided to attach the safety cleat to the wall
We recommend that the cord be wrapped around the safety cleat when the blind is not in use, as shown in the pictures below.
RECOMMENDED CARE FOR WOODEN BLINDS
1. When opening or closing blind only raise or lower the blind when the slats are in the horizontal (open) position. Larger blinds must be raised or lowered in stages. Raising or lowering in one singular motion places excessive stress on the mechanism, strings, and brackets. Do not force the cord when tilting the blinds, this may cause the mechanism to break.
2. It is not recommended that wooden blinds be fitted in damp or wet environments as warpages may occur.
3. Dust blinds regularly.
4. If the blind becomes damp or wet, wipe down immediately. The slats should be horizontal (open) and the blind released and lowered completely. Allow to dry by removing the blinds from the brackets and lay down on a hard surface. Do not place in direct sunlight as excessive heat may cause the slats to warp. If the blinds are excessively wet do not place the blinds on a surface that may absorb any stain.
5. This wooden blind does not require any oiling.