


Fitting Instructions Faux Wooden Blinds
How to fit and operate your 65mm Faux Wood Blind with valance
You should have:
First check you’ve got all the fittings that come with your blind.
Safety cleat: x 1
Valance hook and clip:
Quantity to suit length of blind
Matching valance returns and corner clips: x 1 pair
(if blind is to be fitted outside the window recess)
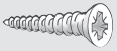
Wood screws: x 4
Brackets: x 1 pair

Valance: x 1
Getting started
You will need:
- A drill with correct bit
- A crossheaded screwdriver
- A metal tape measure
- A metal tape measure
- A pencil
- Your brackets are packed separately in the box. Please ensure you’ve located them before disposing of the packaging.
- The brackets are a universal type that can be used to top fix the blind into a recess or face fix into a frame or a wall.
- Additional brackets are also supplied with larger blinds. These should be located as close to the centre of the blinds as possible, avoiding any slat support ladders.
- Please read the following instructions carefully before you start fitting your blind.
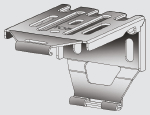
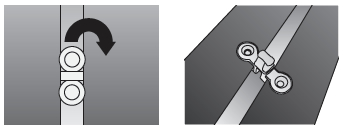
1 To fix the brackets
- Locate the measuring points you used to calculate the width of the blind. You may be able to use the blind as a template.
- Ensure the brackets are positioned a suitable distance away from any window handles or obstructions to allow the blind to operate smoothly.
- Ideally, position the brackets 5cm in from each end of the head rail. Any additional brackets supplied should be fitted as centrally as possible, taking into consideration the components in the headrail.
- Hold a bracket in position and mark where the screws will go, using the relevant holes in the bracket as a guide.
- If you’re fitting to a wall or lintel, use a drill with the suitable sized bit to make your holes, and push in wallplugs.
- If you’re fitting into a wooden frame, screw your brackets into position. You may want to make pilot holes to allow easier fixing of the screws.
- Fix the bracket into place and repeat on the other side of the blind.
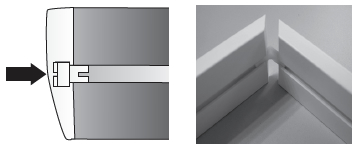
2 To fit the blind
- Attach the valance hooks to the front edge of the head rail at equal distance apart along the length of the rail.
- Locate the headrail into the hooked channel at the bottom of the bracket and raise the front of the headrail until it reaches the front of the bracket. Press the headrail face to make the headrail and bracket snap together. Installation complete.
- To remove headrail - push the headrail face to release from bracket and lower the front face (reverse of installation - step 1).
3 To fix the valance
- . Fit the valance clips into the groove on the back of the valance at equal distance apart along it’s length.
- Line up the valance clips with the hooks on the blind. You can easily slide the hooks on the head rail to match the position of the hooks.
- Push the valance into place.
- To fit the valance returns to the sides of the valance (if required) slide the corner clips into position in the grove on the back of the valance.
- Push the valance returns onto the clip.
Safety tips:
There are things that you can do to reduce risk in your home.
- Move beds, cots and furniture away from the window.
- Do not let cords or chains hang loose. Make sure they are kept out of reach of children at all times.
- Do not tie loose cords and chains together.
- Check the condition of all safety devices if not used regularly and replace if the device is faulty.
Operating your blind:
Operating your blind is easy. Just follow these instructions.
- There are two controls that will operate the blind - a tilt control and a raise lower control.
- To raise the blind, pull the cord down until the blind is at the height you want and lock into place by moving the cords across the blind
- To lower the blind, release the cord by moving them away from the blind, then let the cord slide through your fingers.
- Slats should be open when raising or lowering the blind.
- To adjust the angle of the slats, operate the tilt control cords as required.
How to fit and use your
Child Safety Devices
4 Warning
Blinds can be potentially dangerous to small children. Please be aware that swallowing small parts can cause internal asphyxiation. Looped or low hanging cords, chains or tapes can create hazardous loops which could lead to the risk of strangulation. We do everything we can to ensure your chosen product is child safe. As a minimum all of our blinds meet the European Standard BS EN 13120 for safety. Our instructions and the supplied Child Safety device(s) are intended for you to ensure that your blind is as safe as possible.
The information below gives guidance for fitting the provided child safety devices. All safety devices must be correctly installed for the protection from strangulation of young children and the proper use of the blind. Please read the instructions carefully and keep safe for future reference.
Only use the devices and cords provided with your blind. Videos showing how to fit and reconnect child safety devices are available, along with replacements at www.makeitchildsafe.co.uk.
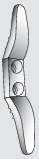
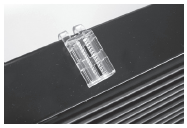
5 Fitting the safety cleat
Blinds that require a safety cleat must not be installed less than 1.5m from the floor. Safety cleats are designed to keep cords taut and out of reach of children – always wrap the cord around the cleat.
Fix the safety cleat to the wall with 2 screws in a position that’s out of reach of children. Install it as close to the head rail as possible, ensuring that it is no closer to the floor than 1.5m. See fig. 1.
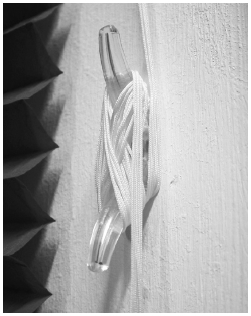
fig 1
If more than one cleat is required for the complete amount of cord to be wrapped around, ensure that they are positioned no further apart than 20cm and both are no closer to the floor than 1.5m.
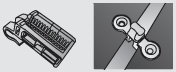
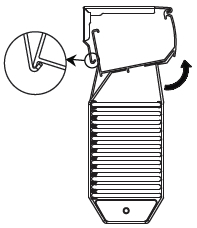
6 To re-assemble the cord consolidator
Note - the consolidator is designed to come apart to remove a hazardous loop.
To reconnect the consolidator, check that it is not damaged, then re-insert the free cords as described below. If any slack cording appears above the consolidator, lower the blind so that it is straight and raise it again.
- Gather the loose cords together and align the knots. See fig.1.
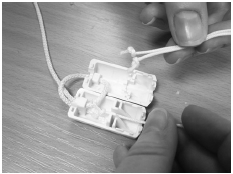
fig 1
- Insert the knotted ends into the groove at the top of the consolidator, ensure that the knots are secured below the central panel. See fig. 2.
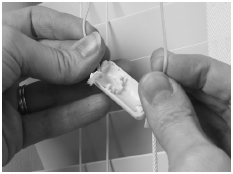
fig 2
- Secure the two halves together. See fig. 3.
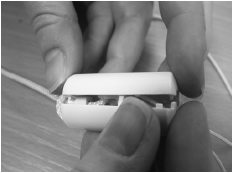
fig 3